The BigML Team is bringingPrincipal Component Analysis (PCA)to the BigML platformon December 20, 2018。As explained in ourintroductory post,PCA is an unsupervised learning technique that can be used in different scenarios such asfeature transformation,dimensionality reduction, andexploratory data analysis。主成分分析,解释了简而言之,从根本上transformsa dataset defined by possiblycorrelated variablesinto a set of uncorrelated variables, calledprincipal components。
In this post, we will take you through thefive necessary stepsto upload your data, create a dataset, create a PCA, analyze the results and finally make projections using the BigML Dashboard.

We will use the training data of theFashion MNIST dataset from Kagglewhich contains 60,000 Zalando’s fashion article images that represent 10 different classes of products. Our main goal will be to use PCA toreduce the dataset dimensionalitywhich has784 fieldscontaining pixel data to build a supervised model thatpredicts the right productcategory for each image.

1. Upload your Data
Start by uploading your data to your BigML account. BigML offers several ways to do so: you can drag and drop a local file, connect BigML to your cloud repository (e.g., S3 buckets) or copy and paste a URL. In this case, wedownload the datasetfrom Kaggle and just drag and drop the file.
BigML automatically identifies thefield types。We have784 input fieldscontaining pixel data and correctly set asnumericby BigML. The objective field “label” is also identified as numeric because it contains digit values from 0 to 9, however, we need to convert this field intocategoricalsince each digit of this field represents a product category instead of a continuous numeric value. We can easily do this by clicking on the“Configure source”option shown in the image below.

2.创建一个数据集
From your source view, use the1-click datasetmenu option to create a dataset, a structured version of your data ready to be used by a Machine Learning algorithm.
In the dataset view, you will be able to see a summary of your field values, some basic statistics, and the field histograms to analyze your data distributions. You can see that our dataset has a total of60,000 instanceswhere each of the 10 classes in the objective filed has6,000 instances。

3. Create a PCA
Before creating the PCA we need to split our dataset into two subsets:80% for trainingand20% for testing.This is because our main goal in building a PCA is to reduce our data dimensionalityto build a supervisedmodel that can predict the product categories afterwards. If we used the full dataset to build the PCA and then split the resulting dataset into the train and tests subsets to build the supervised model, we would be introducingdata leakage, i.e., the training set would contain information of the test set. However, this split wouldn’t be necessary if we wanted to use PCA for other purposes such as for data exploration.

Next, we take the 80% training set to create the PCA. You can use the1-click PCAmenu option, which will create the model using the default parameter values, or you can adjust the parameters using thePCA configurationoption. Anotherimportantthing to consider at this point is that we need toexclude our objective fieldfrom the PCA creation to avoid another possibledata leakagescenario. Otherwise, we will be mixing information about the objective field into the principal components that we will use as predictors for oursupervisedmodel.

BigML provides the following parameters to configure your PCA:
- Standardize: allows you to automatically scale numeric fields to a 0-1 range. Standardizing implies assigning equal importance to all the fields regardless if they are on the same scale. If fields do not have the same scale and you create a PCA with non-standardized fields, it is often the case that each principal component is dominated by a single field. Thus, BigML enables this parameter by default.
- Default numeric value: PCA can include missing numeric values as valid values. However, there can be situations for which you don’t want to include them in your model. For those cases, you can easily replace missing numeric values with the field’s mean, median, maximum, minimum or with zero.
- Sampling: sometimes you don’t need all the data contained in your test dataset to generate your PCA. If you have a very large dataset, sampling may very well be a good way to get faster results.

4. Analyze your PCA Results
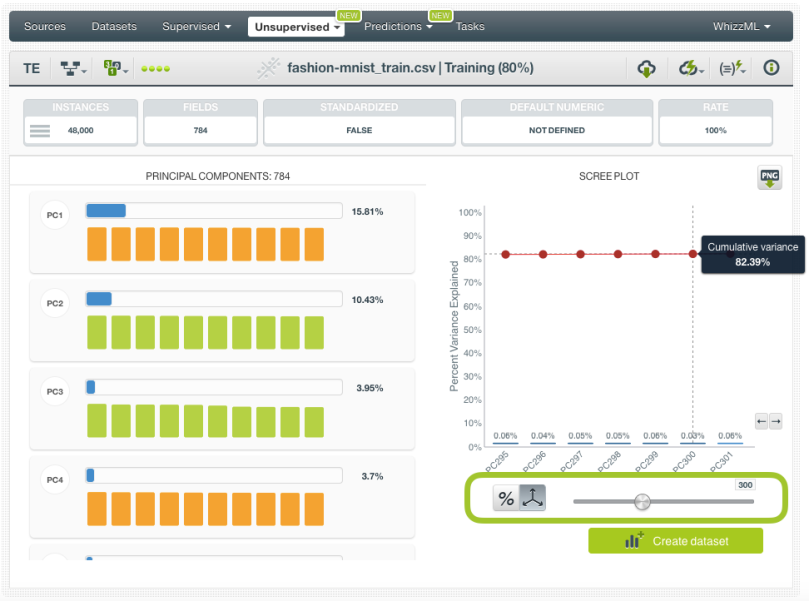
When your PCA is created, you will be able to visualize the results in thePCA view, which is composed of two main parts: theprincipal component listand thescree plot。
- Theprincipal component listallows you to see the components created by the PCA (up to 200). Each of the principal components is a linear combination of the original variables, isorthogonalto all other components, and ordered according to the variance. Thevarianceof each component indicates the total variability of the data explained by that component. In this list view, you can also see the originalfield weightsassociated with each component that indicate each field’s influence on that component.

- Thescree plothelps you to graphically see the amount ofvariance explainedby a givensubset of components。它可以使用to select the subset of components to create a new dataset either by setting a threshold for the cumulative variance or by limiting the total number of components using the slider shown in the image below. Unfortunately, there is not an objective way to decide the optimal number of components for a given cumulative variance. This depends on the data and the problem you are looking to solve so be sure to apply your best judgment given your knowledge of the context.

5. Create Projections
PCA models can be used to project the same or new data points to a new set of axes defined by the principal components. In this case, we want to make预测on our two subsets (the 80% for training and the 20% for testing) so we canreplace the original fieldsby thecomponentscalculated by our PCA to create and evaluate asupervisedmodel.
创建一个数据集from the PCA view
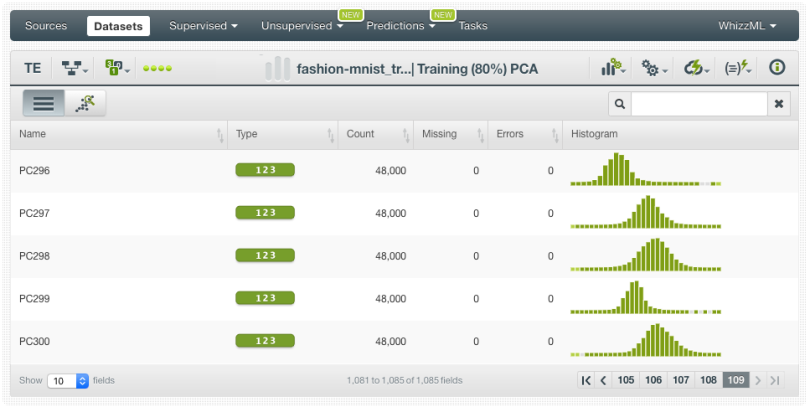
If you want toget the components for the same datasetthat you used to create thePCA,你可以使用“Create dataset”button that BigML provides in the PCA view. This option is like a shortcut that creates a batch projection behind the scenes. For our 80% subset, we are using this faster option. We can see in the scree plot that selecting around 300 components (out of the 784 total components) using the slider shown in the image below, gives us more than 80% of the cumulative variance which seems a large enough number to create a new dataset without losing much information from the original data.
After thedatasetis created we can find it listed on our Dashboard. The new dataset will include the original fields used to create the PCA and the new principal components taking into account the threshold set.
Create a Batch Projection
If you want touse a different datasetthan the one used to create thePCA, then you need to take the long path and click on the“Batch projection”option. We are using this option for our 20% subset. The step-by-step process is explained below.
1. Click on the option“Batch projection”from the PCA view.
2.Select the datasetyou want to use andconfigurethe batch projection if you want. In this case, we are selecting the 20% test subset and we arelimiting the number of componentsto be returned up to 300 by using the slider shown in the image below (as we did with the training set before). We can also choose to remove the original fields or not. In this case, we are keeping them since we want to use the same 80% and 20% subsets to build and evaluate two different supervised models: one with the original fields and another one with the components.
3. When the batch projection is created, you can find the new dataset containing the components in yourdatasetlist view.
Final Results
Using ourreduced dataset with the 300 components, we create alogistic regression预测产品categories. We also create another logistic regression that uses the original784 fieldsthat contained the pixel data so we can compare both models’ performances.

When weevaluatethem, we can observe that the performances of the300 componentmodels(f-measure=0.8449) are almost exactly the same as the one from the model that used all of the original fields (f-measure=0.8484) despite the fact that we only used ~40% of the original fields. This simple act allows us to reduce model complexity considerably, in turn, decreasing the training and prediction times.

想知道更多关于PCA吗?
If you would like to learn more about Principal Component Analysis and see it in action on the BigML Dashboard, please reserve your spot for our upcoming release webinar onThursday, December 20, 2018。Attendance is FREE of charge, but space is limited so register soon!
